We have all been there, cruising along, making changes, making commits, and just as you are about to call it a night, you realize you just committed all of your changes to master and not that new branch you forgot to checkout to.
Fear not! You can salvage those changes and put them where they belong!
Keep in mind, all exercises expect you to have run the script to create files using the scripts found on the Set Up Your Environment page.
I didn't push
The good news is, you didn’t push, so none of the collaborators on your project know you just committed a bunch of changes directly to Master on ‘accident’ (I mean, lets be serious, those changes are awesome and are definitely gonna get merged). Here is how we can fix that ‘mistake’.
- Ensure you are on the branch you accidentally made those commits to. If you followed the ‘Setting Up Your Scenario Environment’ directions, you should have made a few commits to a branch named
test. - Enter:
git log --onelineand identify the SHA-1 hash associated with the commit just before the first incorrect commit. In this case, let’s pretend file 5 was the first one that should have been on the other branch. - Enter:
git reset --mixed SHA-1, whereSHA-1is the SHA-1 associated with the adding file 4 commit. - Enter:
git status. You should see files 5 and 6 in your working directory. - Enter:
git checkout -b correct. This will create a new branch namedcorrectand check you out to that branch. - Enter:
git status. Files 5 and 6 should still be in your working directory. - Add both File 5 and File 6 by entering:
git add file*. - Enter:
git status. File 5 and 6 should now be in the staging area waiting to be committed. - Enter
git commit -m "Adding file 5 and 6".
Congratulations, you just removed the commits you made to the incorrect branch and added them to the correct branch!
P.S. Next time, try to remember to run a quick git checkout BRANCH before you get working on that sweet new feature ![]() .
.
I pushed
First Things First: Fix Master
Since this usually happens on master, the first thing you probably need to do is get those untested, unapproved commits out of master.
- While on
masterenter:git log --oneline. Identify the SHA-1 hash for the commits that should be removed. In this case, let’s use the adding file 3 commit. - Enter:
git revert SHA-1, where SHA-1 is the hash for the adding file 3 commit. You can revert multiple commits in the same operation by adding a list of SHA-1’s with a space between each one. - You can modify the revert commit message(s) if you would like or just close the editor.
- Use
git pushto send the changes to the remote.
Rebuilding the Branch
Now that master is safe, let’s create a new branch and grab those commits.
- Create a new branch with:
git checkout -b BRANCH-NAME(or check out to one you had already created). - Enter
git reflogto identify the SHA-1 hash for the commits you need to rescue. - Enter:
git cherry-pick SHA-1, where SHA-1 is the hash for the commit you want to place on the branch. You can cherry pick multiple commits by adding multiple SHA-1s separated by a space. - Push your new branch to the remote with:
git push -u origin BRANCH-NAME
Tell me why
Cherry-pick
Cherry-pick allows you to apply a single commit to another branch (or rescue it from your reflog).
How Cherry-pick Works
When you use git cherry-pick, git generates the difference between the commit you have designated and its parent commit (the one just before it) and then applies that diff wherever you are.
For example, let’s pretend you have a simple branch called new-branch.
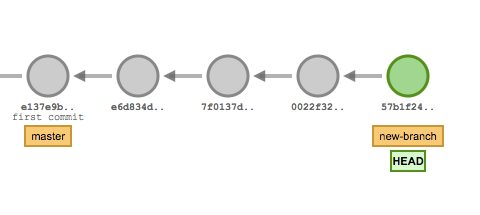
You are generally unhappy with the way this feature is going, so you decide to cherry-pick the good parts and use them to try out a different idea. So you check out to better-branch and then cherry-pick 7f013 from new-branch.
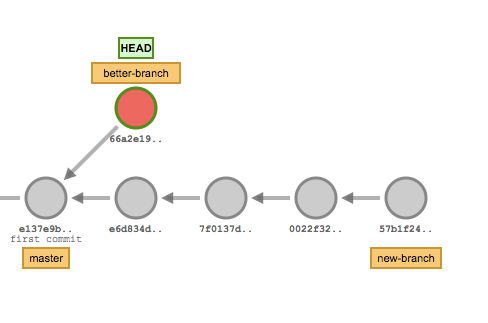
Now, 66a2e represents the same diff that was introduced in 7f013 on new-branch.
You aren’t limited to cherry-picking commits attached to a branch, you can also cherry-pick a commit from the reflog!
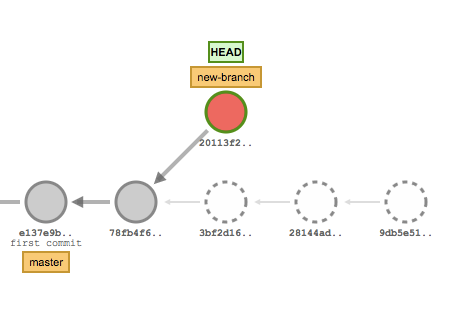
In this example, we created 4 commits on new-branch, then did git reset --hard HEAD~3. The three commits with dashed lines are considered “unreachable” because they aren’t currently attached to a branch. So we cherry-picked 28144 to rescue that commit from the ashes.
Why Did the SHA-1 Change?
So, after you cherry-picked your commit you might have noticed that the SHA-1 associated with the commit is now different. That is because the SHA-1 doesn’t just identify the file (or files) that have been committed. It actually contains a lot of additional information like Date, Time, Author, and other information. So, even though you might have created a commit with the exact same file from before, you will have a completely new SHA-1 hash for the commit. Pretty cool, huh?
Revert
For more information about revert, check out the ‘Tell me why’ section in the Accidental Commit scenario.
Reset
For more information about reset, check out the ‘Tell me why’ section in the Too Many (small) Commits scenario.
What Happened to File 4?
When you were running the git reset --mixed SHA-1 you might have expected file4.md to be included in the files that got sent to the Working Directory. This is a very misconception when it comes to git reset, so don’t worry, you are not alone! When you run git reset, you are identifying the commit that you want to reset to.
For example, if you had wanted to include file4.md’s commit with the reset command, you would have needed to use the SHA-1 associated with the adding file 3 commit.